Controlling Shapeoko with GRBL
October 17, 2013 Leave a comment
GRBL [link]
Grbl is software for controlling the motion of machines that make things. If the maker movement was an industry, Grbl would be the industry standard,,,
…We decided on the Arduino for several reasons. Most importantly it was, and still is, the most popular embedded system in the DIY community. It is a touchingly simple computer.
Thus the GRBL software, which has been implemented to run on an Arduino (Atmega328-based Arduinos), is used to control the Shapeoko CNC machine. In order to upload the software to the Arduino, you can follow the “official” procedure explained here [link].
This is what GRBL does”
- Parse G-Code, a cryptic computer language hailing from the 50s used to describe the idealized actions of milling machines.
- Build a model of those actions and translate them into a physically possible sequence of motions for the given machine.
- Execute these motions by sending a unwavering stream of concerted high frequency pulses to the stepper motors that are actually moving the tool.
GRBL turns an Arduino into a full brown G-code interpreter.
UPLOADING GRBL TO ARDUINO: The standard way
If you are familiar with Arduino, there is a standard way for uploading (flashing) s/w to the Arduino by using the Arduino development environment (IDE). I prefer to use this standard way rather than the “official” way.
Fortunately, Protoneer has created an Arduino library for GRBL which allows using the Arduino IDE for flashing GRBL to the Arduino [link]. You must be wondering, since you upload “sketches” to the Arduino, what does the GBRL sketch look like?
#include <grblmain.h>

void setup(){
	startGrbl();
}

void loop(){}
That’s it. The sketch does nothing. The advantage of doing it this way is that the Arduino remains a full brown Arduino and can run any other s/w you might write in addition to running the GRBL code.
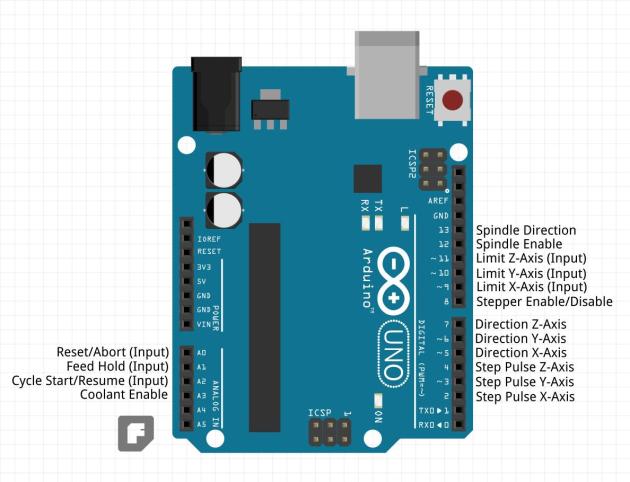
GRBL PIN CONNECTIONS IN ARDUINO [link]

Recent Comments